No products in the cart.
Uncategorized
How To Activate an eSIM From Anywhere
If you travel often and are frustrated by daily roaming fees, an eSIM could be your next travel hack. An eSIM allows you to connect to the internet in hundreds of countries and regions worldwide simply by activating a prepaid data plan. Here’s how to activate an eSIM anywhere and everywhere you travel.
1. Choose an eSIM Plan
If your phone is unlocked and eSIM-capable, you’re on track to try your first eSIM. Unlike a physical SIM card, an eSIM is built into your device, and getting connected is as easy as purchasing, downloading, and activating an eSIM plan.
Airalo offers eSIM plans for hundreds of countries and regions around the world (we even have a global plan if you’re off on an extended adventure!). Here’s how to choose your plan:
- Go to our website
- Select your destination (remember you can choose a country, regional, or global plan)
- Choose a plan with the amount of data and length of time that suits your travel plans
2. Install Your eSIM
What you need to know about installing an eSIM?
- There are two ways of installing an eSIM on your device:
- QR code method
- Manual Method
- Although we guide you through both, the QR code method is highly recommended.
- The setup should take about 2-3 minutes only.
How to activate eSIM on iPhone
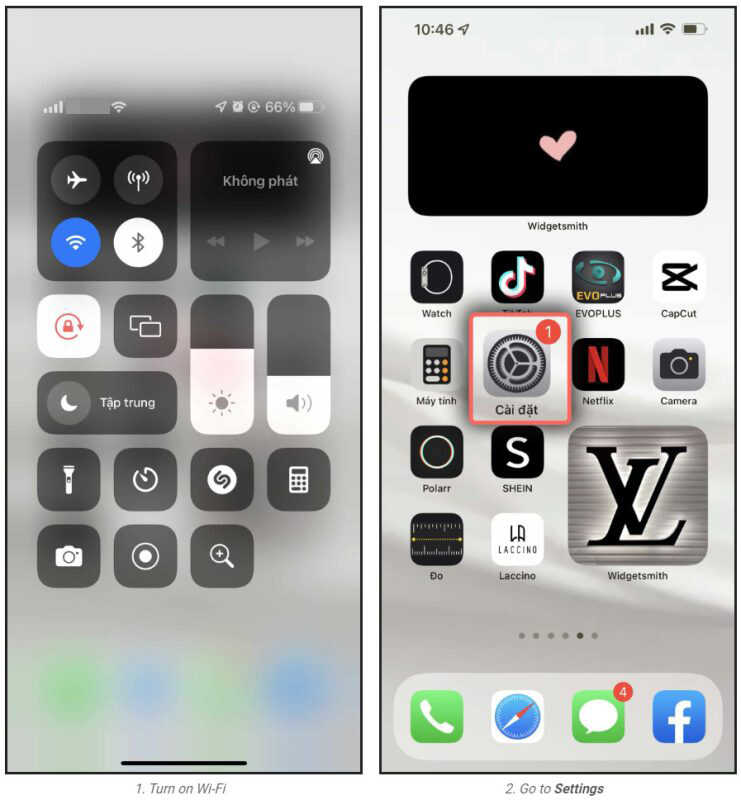
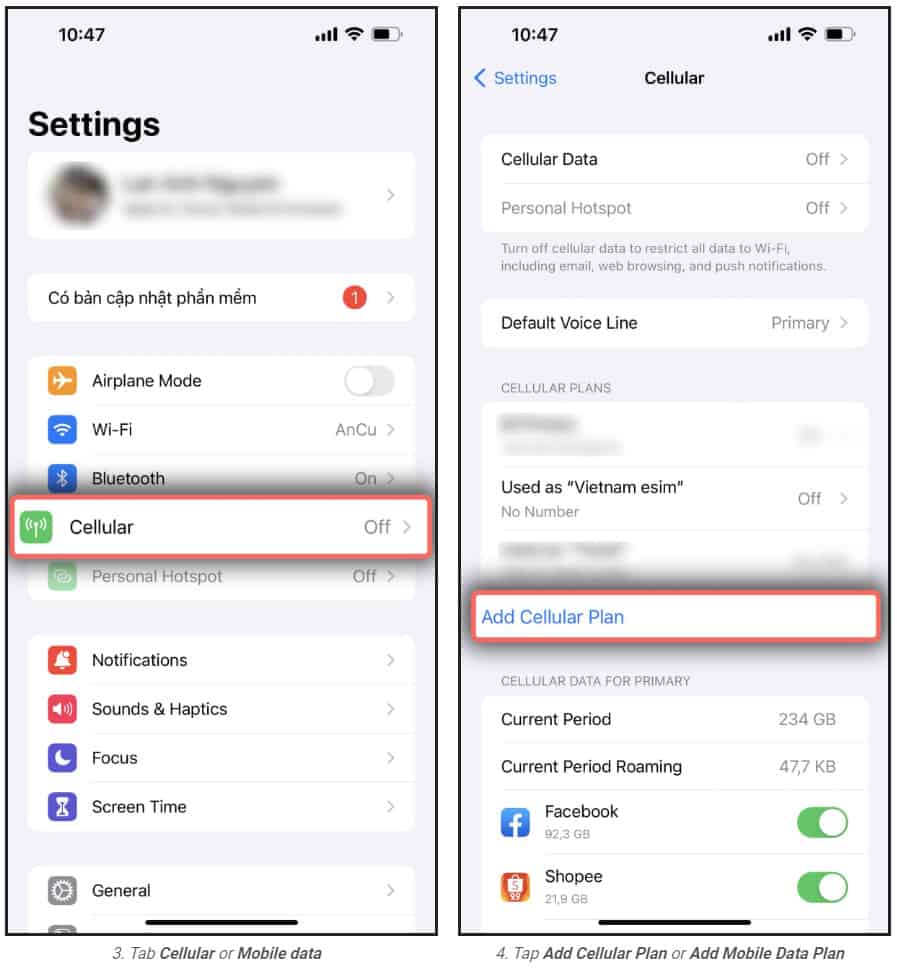
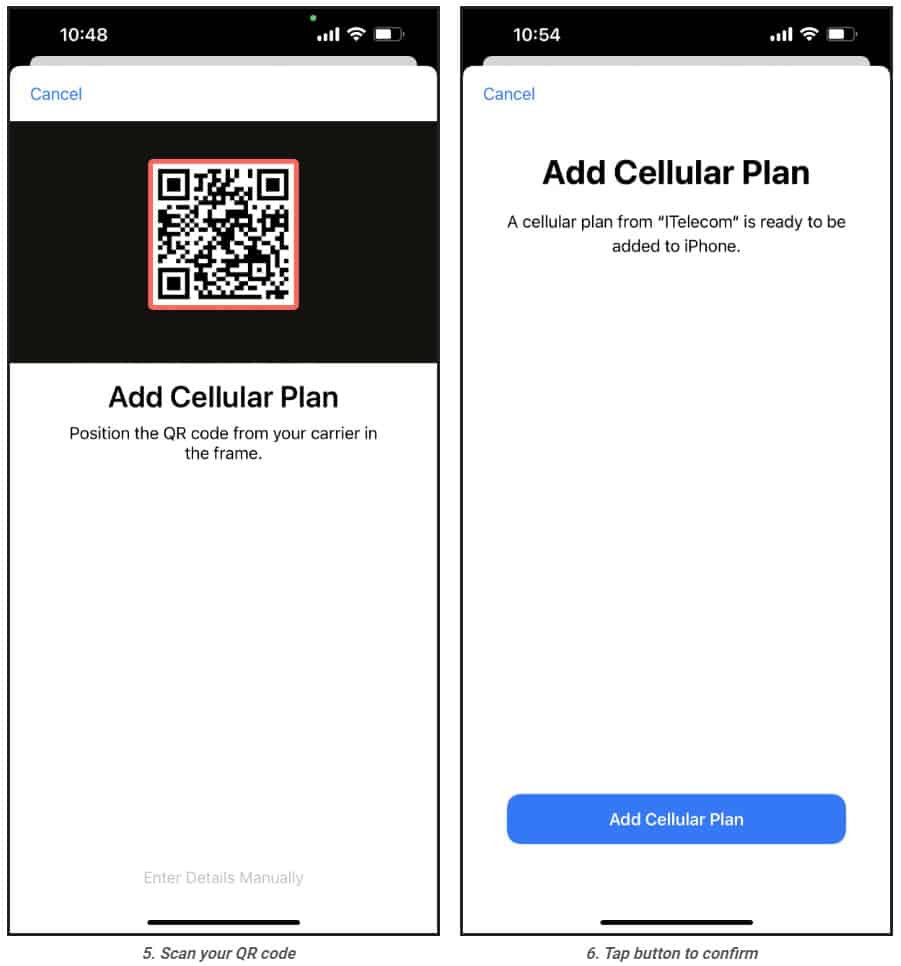
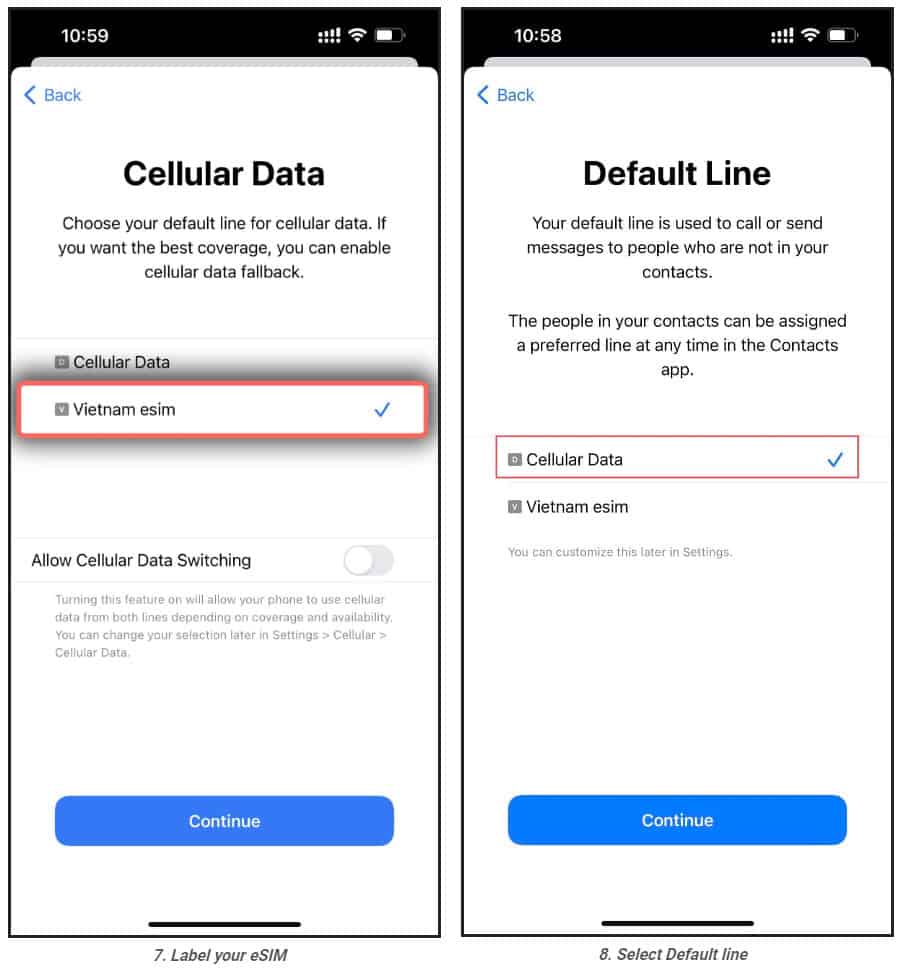
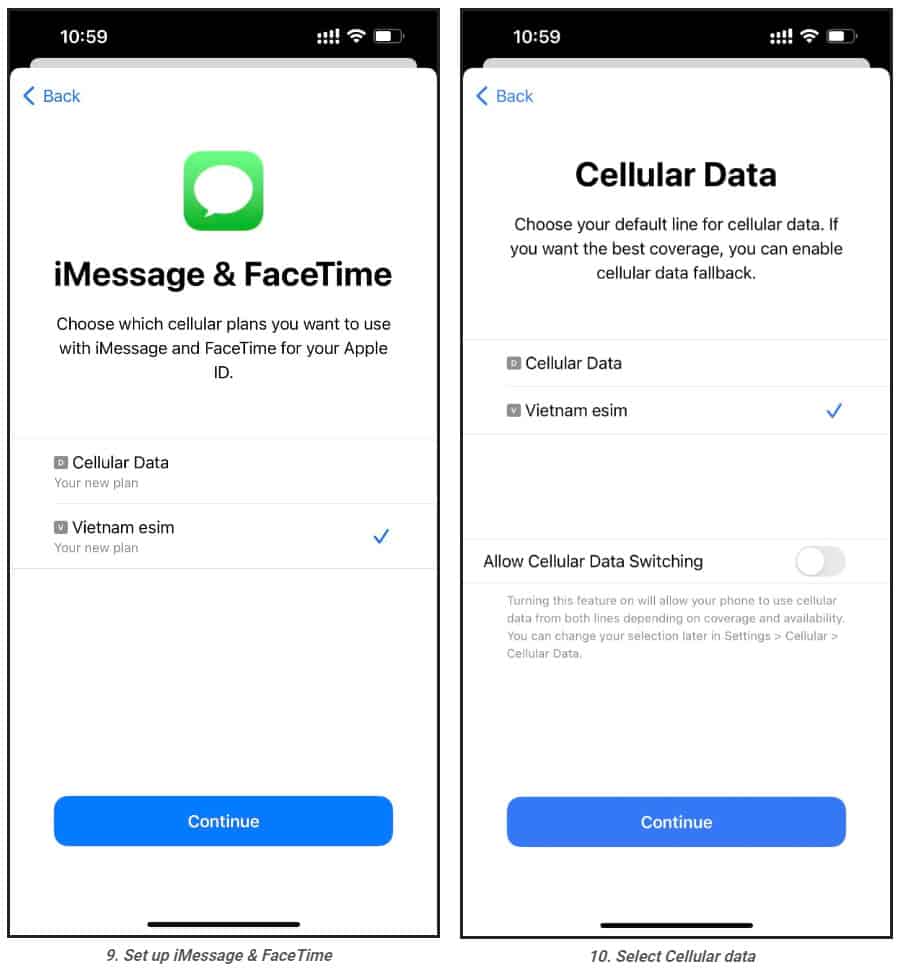
1. Installation
1.Turn on Wifi-Connection of your iPhone
2.One your device, go to Settings. If it isn’t available on your Home screen, swipe left to access the App Library, and search for it on the search bar.

3.Tap Cellular or Mobile (depending on your phone)
4.Tap Add Cellular Plan or Add Mobile Data Plan (depending on your phone)

5. Scan your printed QR code or the QR code you keep on another device. In case you cannot scan the QR code, you can select Enter Details Manually at bottom of your iPhone screen, and enter the following information:
SM-DP+ Address which looks like RAP-0126.OBARTHOR.NET
Activation Code which looks like FA9F0-MWFO-M4HOC-BUBGX
Confirmation Code(optional)
6.Tab Add Cellular Plan or Add Mobile Data Plan to confirm the installation.

7.On the Cellular or Mobile data plan labels screen, choose the available label (such as Secondary, Business, Travel , etc.) or
customize label for your eSIM, and then tap Continue
8.On Default line page, select your Primary number if your data eSIM does not come with a phone number for calling or you do not intend to use this number to make call or send SMS to people who are not in your contacts.

9.On the iMessage & Facetime page, choose your eSIM.
10.On the Cellular Data or Mobile Data Plans page, select your eSIM. Remember to turn off the Allow Cellular Data Switching button to avoid expensive roaming charges.

2. eSIM activation and data use
1.One your device, go to Settings,
2.Tap Cellular or Mobile Data (depending on your phone)
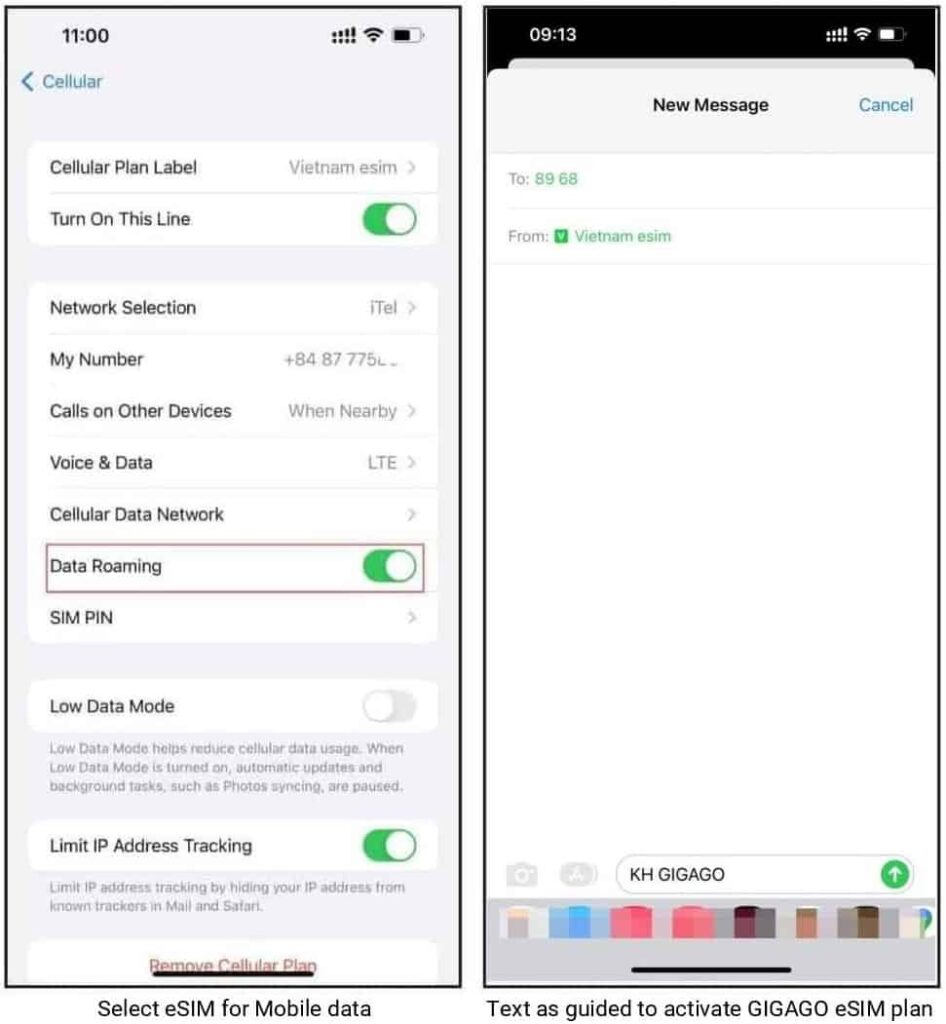
3.Select the eSIM to be used and enable Turn On This Line and Data Roaming.
4.Go to the Messages, switch your phone number to your eSIM and text as guided to activate the data plan (only applicable to Airaloesim travel eSIM)

In case you cannot connect to the internet, please adjust your phone APN (access point name) by:
1.On your device, go to Settings
2.Tap Cellular or Mobile (depending on your phone)
3.Select your eSIM which has enabled Turn On This Line and Data Roaming
4.Tap Cellular Data Network or Mobile Data Network (depending on your phone)
5.Enter provided APN on all APN fields ( Cellular/Mobile data, and Personal Hotspot) or a different value if you use eSIM from another provider, the other fields are left blank.
Now, enjoy your internet and discover our amazing places.
How to activate eSIM on Samsung
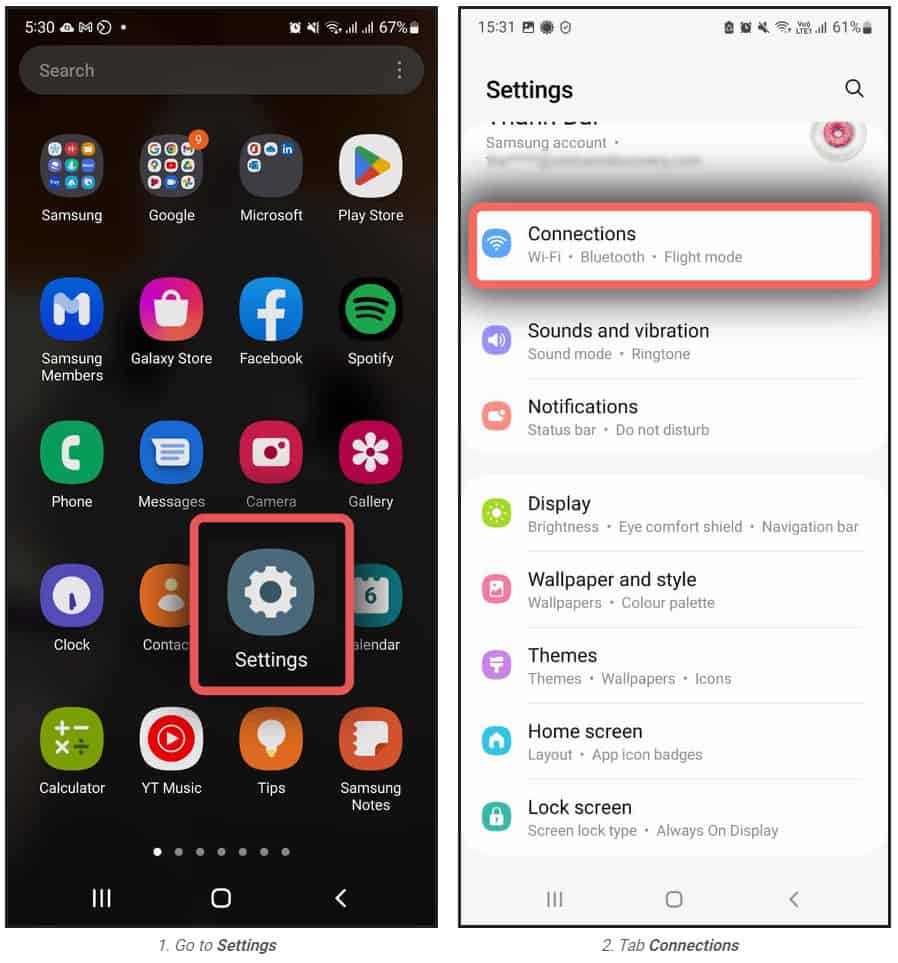
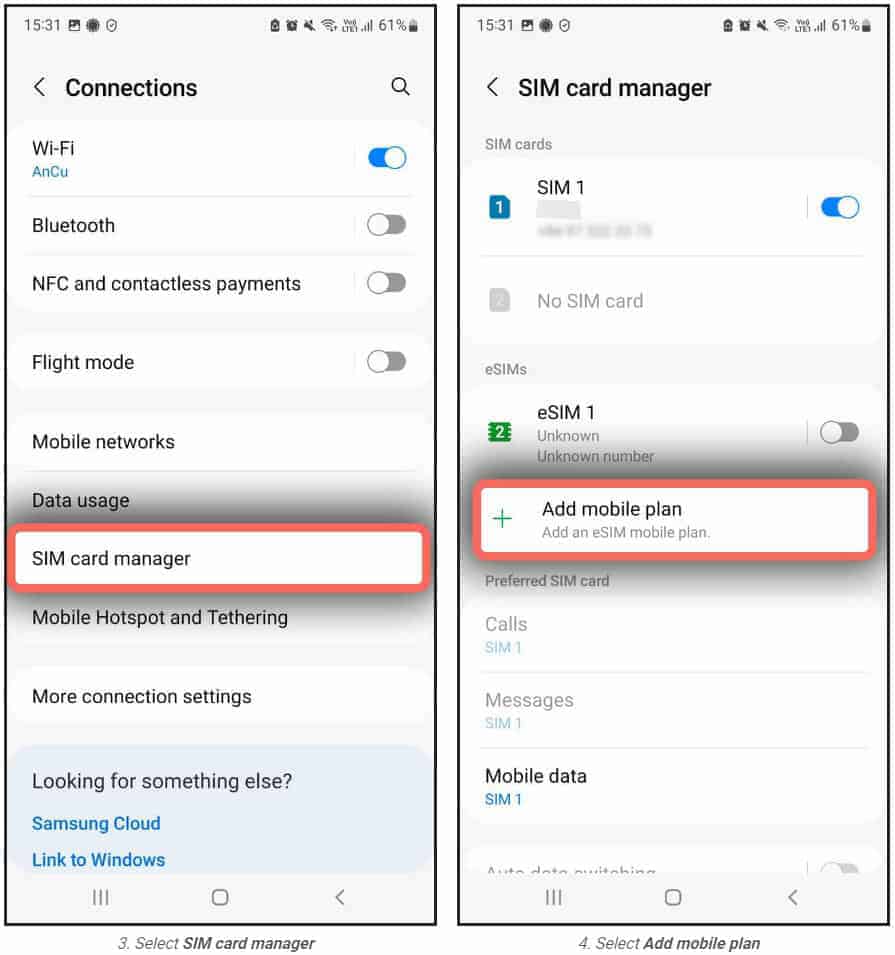
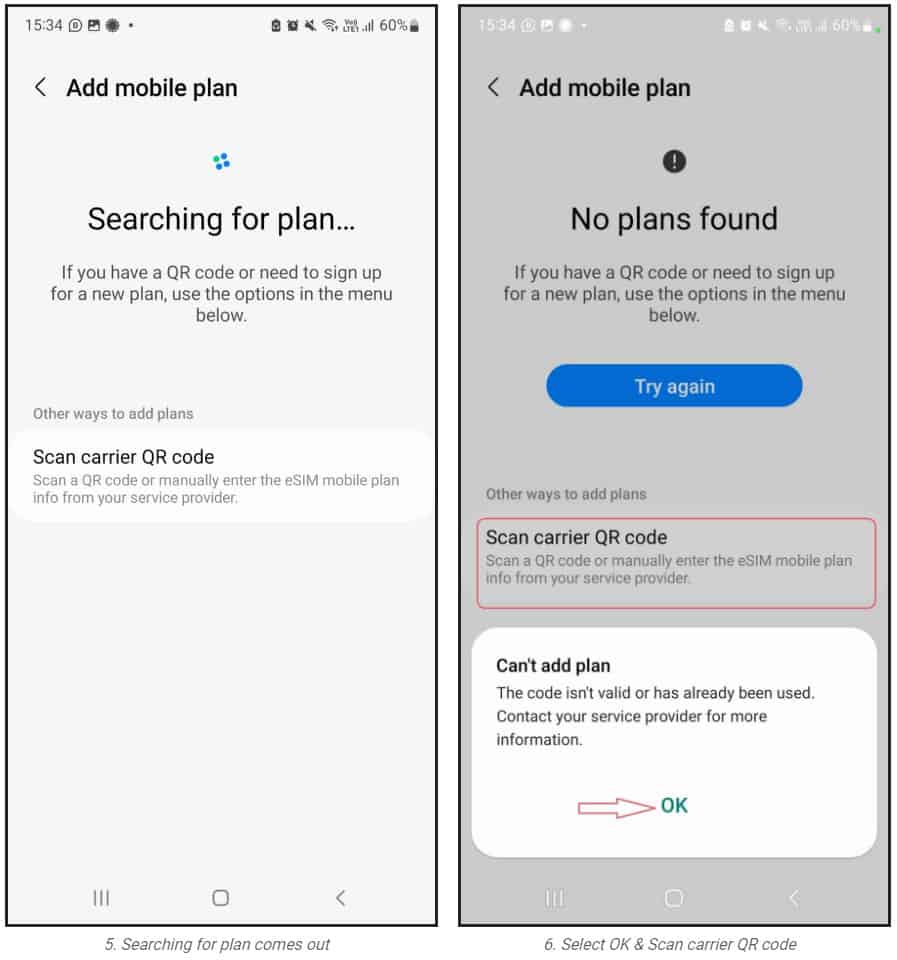
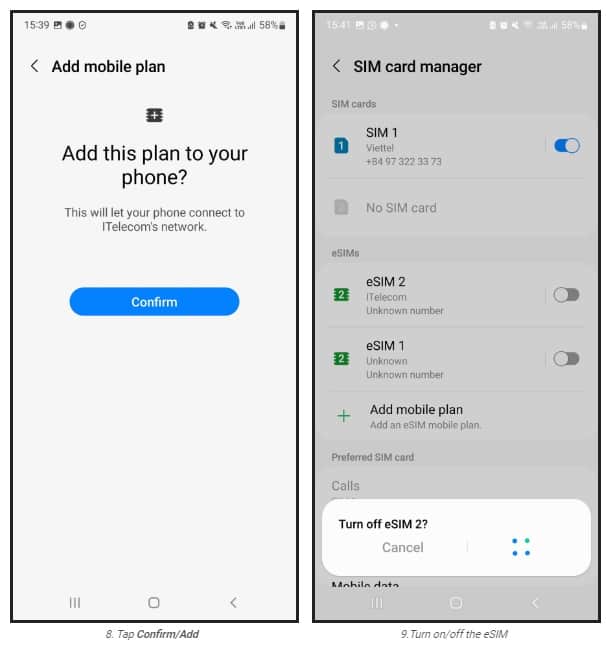
1.Installation
One your device, go to Settings.
Tap Connections

Choose SIM card manager
Choose Add mobile plan

The searching for plan comes.
If the No Plans found screen appears, tap OK on the popup message, and then tab Scan carrier QR Code.
Position the QR Code within the guided lines to scan it. In case the scanning fails, tab Enter code instead at the bottom of the scree, and enter the activation code provided to you by the eSIM provider which looks like LPA:1$RtP-0026.OBARTHAR.NET$PJ2HV-UABNN-SPKQE-GHKFZ.
Note: In some cases, you select the Add using QR code option, but you still see the Activation code line on your scanning screen, tab it and then enter the activation code.

Once the eSIM plan has been detected, tap Confirm/Add (depending on your phone)
When your plan has been registered, select OK to turn on the plan , or Cancel.

2.eSIM activation and data use
When you need to use your travel eSIM, you will need to:
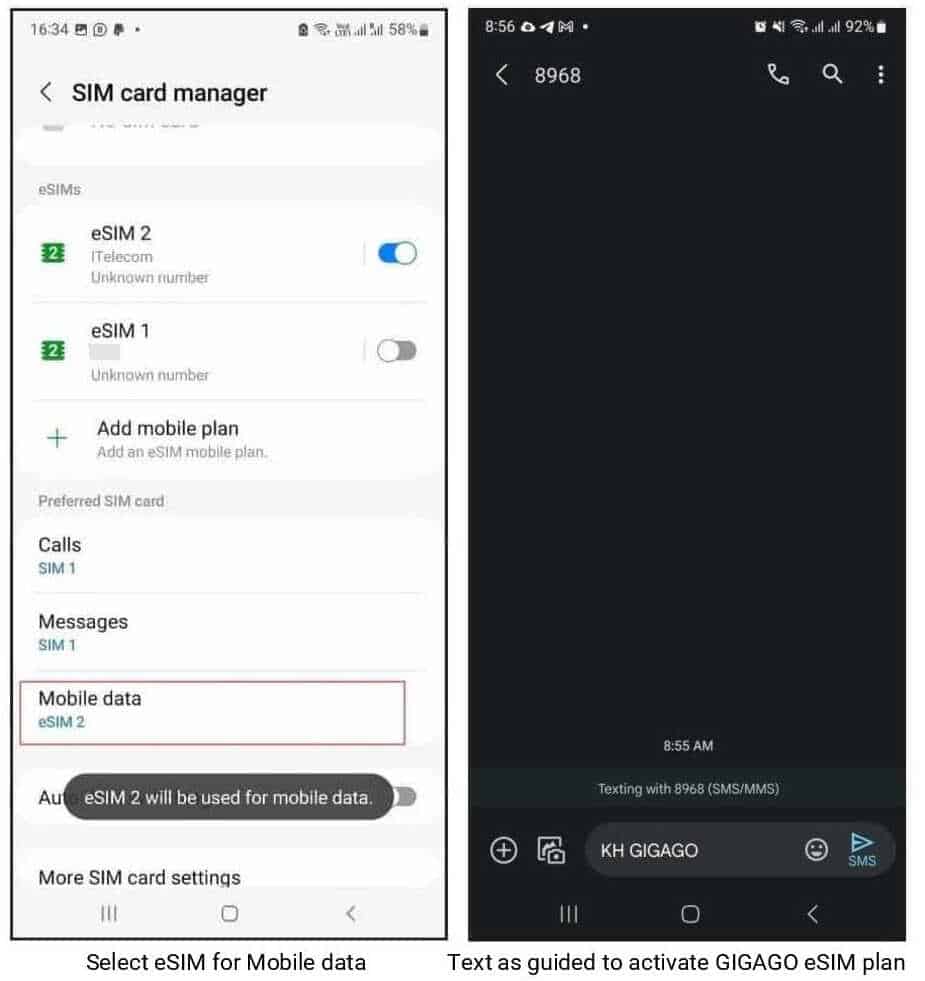
Go to Settings >> Connections > SIM card manager, and select your eSIM and turn it on, and select your eSIM as Mobile data.
Then get back to Connections > Mobile networks to turn on Data roaming of your phone.
Go to the Messages, switch your phone number to your eSIM and text as guided to activate the data plan.

In case you cannot access the internet, please set up your APN (access point name) by:
Going to Settings >> Connections >> Mobile networks
Tapping Access Point Names >> Tapping Add
Select the APN field and enter the mobile operator’s APN, such as m9-itelecom.
That’s all you need for activating your travel eSIM on your Samsung phone.
How to activate eSIM on Google Pixel
1. eSIM installation
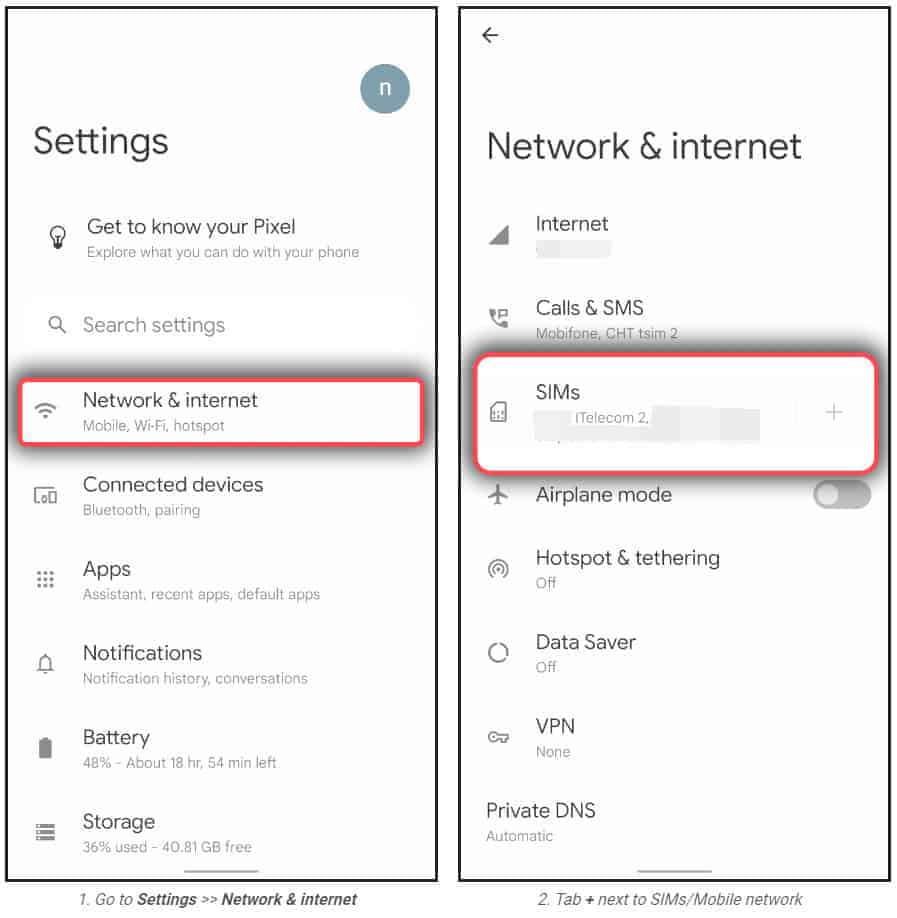
Go to Settings > Tap Network & internet
Tap Add (+ icon) next to “Mobile network” or “SIMs“
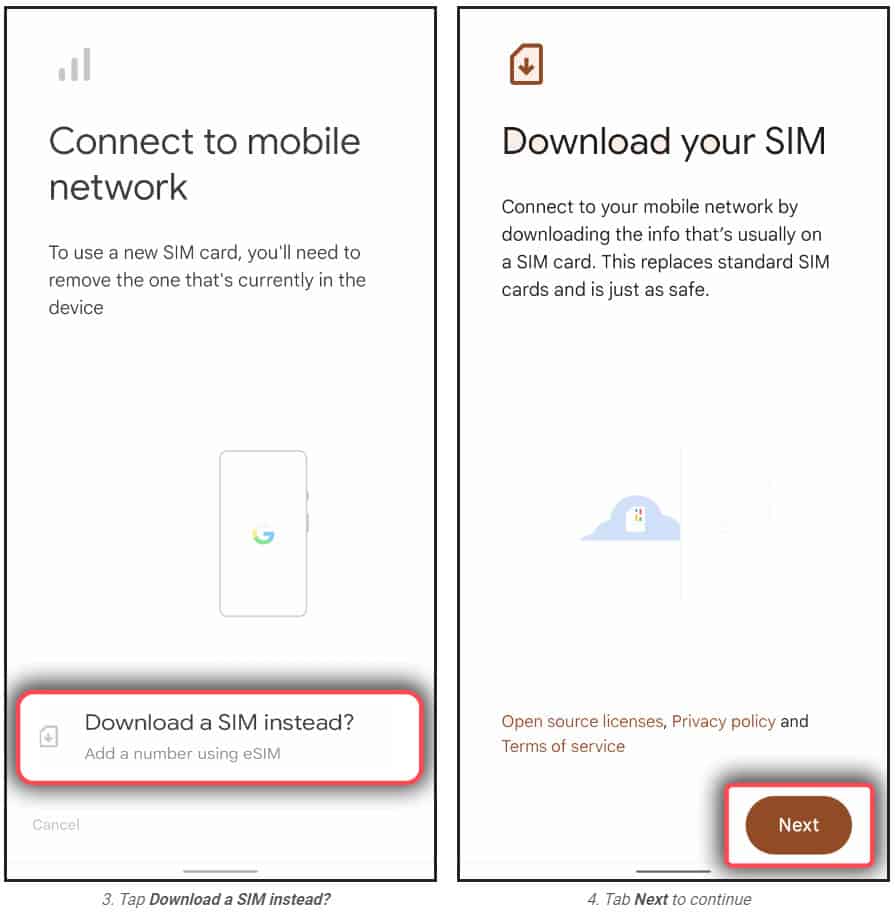
Tap Download a SIM instead?
Tap Next,
Scan your eSIM QR code,
Tap Download to add the eSIM profile to your phone,
Turn off your eSIM
Note: In case you want to rename your eSIM plan, please select the SIM and choose the pen icon on the right top to edit its information.
2.eSIM activation and data use
Go to Settings > Tap Network & internet
Tab SIMs to see list of the SIMs available on your phone
Select your eSIM which will be used and turn it on
Turn your eSIM’s Mobile Data and Roaming on
Go to Messages, switch to eSIM phone number (if you have a physical SIM phone number on your phone), and text to activate your eSIM plan (only applicable to eSIM provided by Gigago).
In case you cannot access to the internet, please set up your APN (access point name) by:
Going to Settings >> Network & internet >> SIMs
Turn on your eSIM if it is turned off, and scroll down, and tap Access Points Names
Tap Add, and select the APN field and enter the provided APN. Other fields can be left blank.

